Canary Release
Canary Release is a deployment strategy to help you roll out the new version of service gradually. During the canary release, only a portion of clients will access the new version (canary). While others still see the old one (stable). Release Manager might increase (or decrease) the portion of traffic to the new version according to their judgment for the stability of the new version.
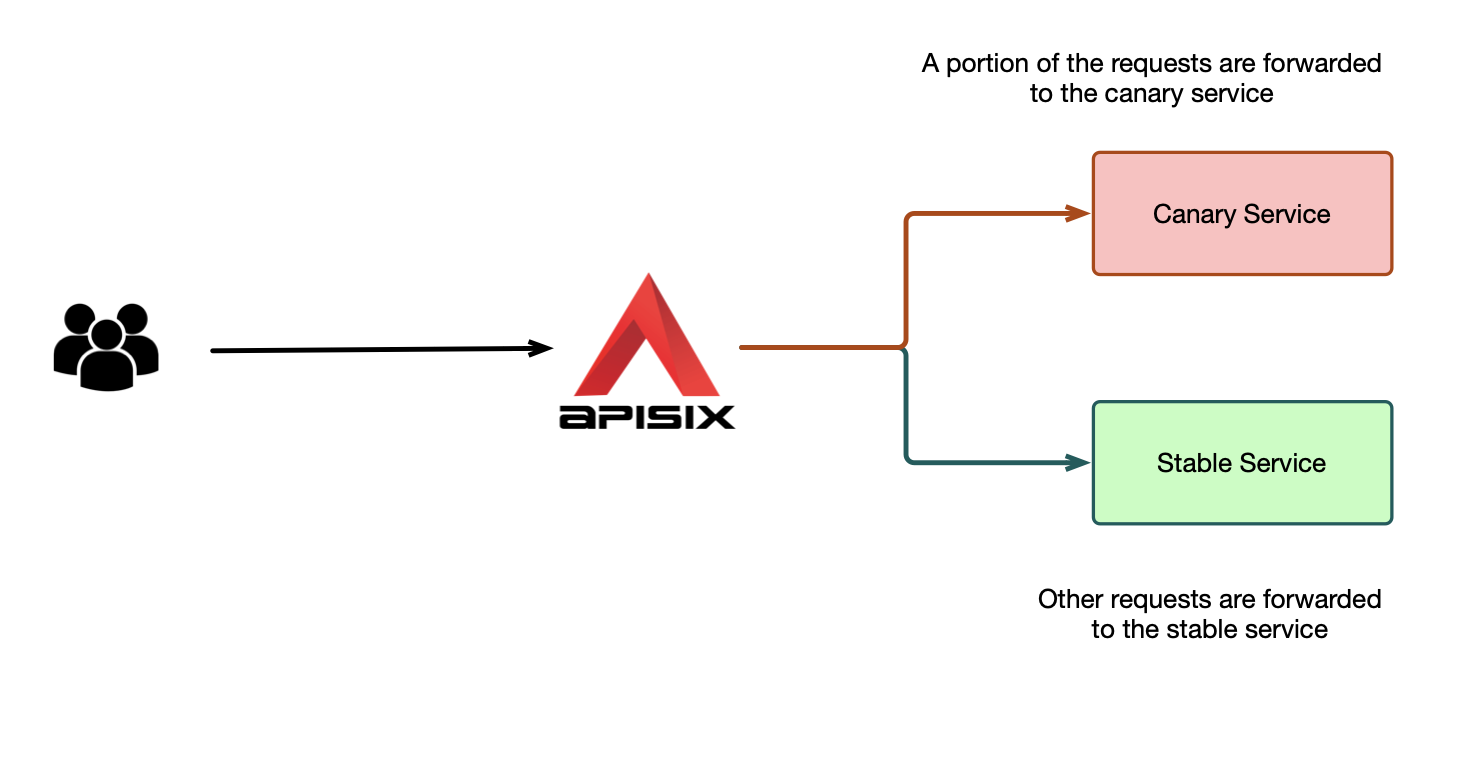
Canary Release reduces the impacts of the new version when it doesn't work as expected. Generally, it's consistently implemented on the API Gateway or Service Mesh.
This guide will help you to use the canary release feature provided by API7 Cloud to roll out your backend services in a reliable way.
Prepare the Environment
Deploy Apache APISIX
Please refer to How to Deploy Apache APISIX to learn how to deploy Apache APISIX and connect it to API7 Cloud. In this guide, we'll deploy an Apache APISIX instance on Docker.
Deploy Backend Service
For demonstration, in this guide, we create two Nginx containers
as two versions of the backend service. The stable service will return stable backend, and the canary one
will yield canary backend.
# stable.conf
server {
    listen 80;
    server_name canary.nginx.test;
    location / {
        return 200 "stable backend";
    }
}
# canary.conf
server {
    listen 80;
    server_name canary.nginx.test;
    location / {
        return 200 "canary backend";
    }
}
Then run these two containers.
docker run --name stable --detach --rm -v /path/to/stable.conf:/etc/nginx/conf.d/stable.conf --network <Apache APISIX Container Network ID> nginx:latest
docker run --name canary --detach --rm -v /path/to/canary.conf:/etc/nginx/conf.d/canary.conf --network <Apache APISIX Container Network ID> nginx:latest
You need to use the absolute paths for both the stable.conf and canary.conf.
We deploy these two containers with the same network of the Apache APISIX container. You can run the command below to get the network id of the Apache APISIX container.
docker inspect <Apache APISIX Container Name/ID> -f '{{ .NetworkSettings.Networks.bridge.NetworkID }}'
Create Service
We'll create a Service with the following steps in this guide.
- Open the API7 Cloud console.
- From the left navigation bar, choose API Management, then select Services from the secondary menu.
- Click on the Create Service button.
- Fill in the form to decide the Service attributes. In this case,
- The Service name is
canary-release. - The path prefix is
/v1. - The HTTP Host is
canary.nginx.test. - Set the upstream URL to the address of the stable nginx service (in our case it's
http://172.17.0.4). Please use the below commands to get the correct IP address in your run.
- The Service name is
You can run the command below to fetch the container address of the nginx services.
docker inspect canary --format '{{ .NetworkSettings.Networks.bridge.IPAddress }}'
docker inspect stable --format '{{ .NetworkSettings.Networks.bridge.IPAddress }}'
Create Canary Upstream Version
API7 Cloud supports creating multiple versions for the upstream of Service. It's handy when there is more than one version for the backend service. We'll create another upstream version to associate the canary nginx service.
- Open the API7 Cloud console.
- From the left navigation bar, choose API Management, then select Services from the secondary menu.
- Click on the Service name canary-release that you just created.
- On the Service details page, click on the New Version button, then fill the form:
- Set Version to
canary. - Set the URL to the nginx container address, e.g.,
http://172.17.0.5.
- Set Version to
The newly created upstream won't be effective. API7 Cloud will forward all the traffic to the default
upstream version (you can see the default upstream version in the Upstream Version In Use field). In our case, it's the stable nginx service. You can send some requests to verify
it, and the response body you see is always stable backend.
curl http://127.0.0.1:9080/v1/test-canary -H 'Host: canary.nginx.test' -s
Create a Route
Let's create a route via the steps in How to Create a Route.
This route will accept requests in which URI path is /v1/test-canary, and the HTTP method is GET.
API7 Cloud Canary Release Workflow
API7 Cloud allows users to create canary release rules for each Service (canary release rules for different Service won't affect each other).
A rule you create isn't effective (avoiding some accidental mistakes). Only if you click on the Start button to enable it, can it be effective. You can also pause or delete the rule when it's in progress. If you delete a rule, traffic will be forwarded to the default upstream version no matter its current status. While if you finish a rule, API7 Cloud will forward all traffic to the upstream version you specified in this rule
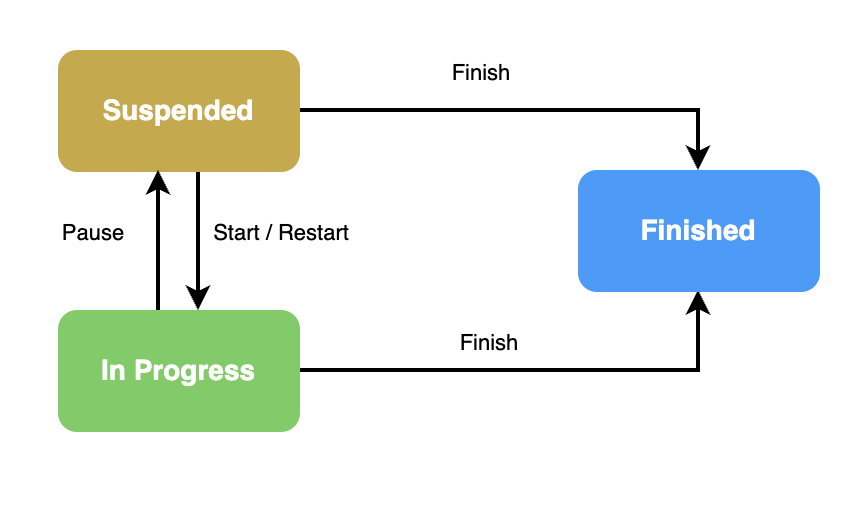
A canary release rule is stateful:
Suspended: A suspended rule won't affect the traffic forwarding. API7 Cloud will forward all the API requests to the default upstream version.InProgress: A rule in progress will affect the traffic shifting.Finished: This is the ultimate status. A finished rule cannot be re-started again.
We can describe the workflow (state transition) of the API7 Cloud canary release as the follows:
- Admin creates a rule according to the requirements (rule status is
Suspended). Then go to2. - Admin makes sure the rule is correct and starts it (
SuspendedtoIn Progress). Then go to3or4. - Admin finishes the canary release since everything is OK after a long while (
In ProgresstoFinished). - Admin pauses the rule because the new release is not stable (
In ProgresstoSuspended). Then go back to2.
API7 Cloud has a limitation that users can only have one canary release rule in progress (for a Service). Since multiple rules in progress will make the traffic distribution chaotic.
Create Canary Release Rule
Shift Traffic by Percentage
We want to forward 50% traffic from the stable nginx service to the canary one. So
we need to do the following steps:
- Open the API7 Cloud console.
- From the left navigation bar, choose API Management, then select Services from the secondary menu.
- Click on the Service name canary-release that you just created.
- On the Service details page, click on the Setup Rule button, then fill the form:
- Set the Name field to
Release the Canary Nginx Service. - Set the Target Upstream Version field to
canary. - Set the Type field to
Percentage Based. - Set the Percentage field to
50.
- Set the Name field to
There are two kinds of canary release rules:
- Percentage Based: Shift traffic according to the proportion specified by the
Percentagefield, in our case, is50. - Condition Based: Shift traffic according to the API requests' characteristics (e.g., HTTP headers, URI).
The rule won't be effective once you create it. its status is Suspended. In such a case, all traffic will still be
forwarded to the stable nginx service. To change the rule status:
To see the rule details, click on the name of the rule. You can also change the rule status there.
Now let's click on the Start button to enable the rule. After that, some API requests (about 50%)
will be forwarded to the canary nginx service.
for ((i = 0; i < 10; i++)); do
curl http://127.0.0.1:9080/v1/test-canary -H 'Host: canary.nginx.test' -s
print
done
You'll see similar output like below:
canary backend
stable backend
canary backend
stable backend
canary backend
stable backend
canary backend
canary backend
stable backend
stable backend
The order in your case might be different, but the request counts to the stable nginx service should be the same as the canary one.
Assume we consider that the canary nginx service is stable enough, and we want to forward all the traffic to it. Then let's finish the canary rule (click on the Finish button) and send some requests to see the output.
for ((i = 0; i < 10; i++)); do
curl http://127.0.0.1:9080/v1/test-canary -H 'Host: canary.nginx.test' -s
print
done
All the lines that you see should be canary backend.
canary backend
canary backend
canary backend
canary backend
canary backend
canary backend
canary backend
canary backend
canary backend
canary backend
After you finish a canary rule, API7 Cloud will change the upstream in use to the one this rule specifies.
We may assign a smaller percentage (e.g. 5%) when creating the canary
release rule in an actual use case. And enlarge the proportion over time (if the canary service is stable). Eventually,
we finished the canary release.
Shift Traffic by Conditions
On the other hand, we may want to shift a specific subset of API requests
to the canary service and forward others to the stable one. We want to forward requests with the request header X-Debug: true to the
canary nginx service. In such a case, we'll create a canary release rule with the
type of Condition Based.
Before you go head, reset the Upstream in Use field of this Service to default. This field was
changed to canary after executing the steps in Shift Traffic by Percentage.
Then create a new canary release rule:
- Set the Name to
Release the Canary Nginx Service with X-Debug header. - Set the Target Upstream Version to
canary. - Set the Type to
Condition Based. - Add a condition:
- Set the Position to
Header. - Set the Name to
X-Debug. - Set the Operator to
Equal. - Set the Value to
true.
- Set the Position to
This rule's condition is that all API requests should carry the X-Debug header,
and its value should be true. Then these requests will be forwarded to the canary upstream version.
Again, after we create this rule, it's suspended, enable it and send two requests to verify it.
curl http://127.0.0.1:9080/v1/test-canary -H 'Host: canary.nginx.test' -s
curl http://127.0.0.1:9080/v1/test-canary -H 'Host: canary.nginx.test' -H 'X-Debug: true' -s
After running the above two commands, you'll see the stable backend and canary backend perspectives.
A rule condition is an expression with the subject, operator, and target value.
The subject (Position field) can be:
Header: Examine an HTTP request header (theNamefield specifies the header name).Cookie: Examine a Cookie value (theNamefield specifies the key).Query: Examine an argument in the query string (theNamefield specifies the argument name).Path: Examine the URI path.
The operator can be:
Equal: Check if the subject is equal to the target value (specified by theValuefield).Not Equal: Check if the subject is not equal to the target value (specified by theValuefield).Regex Match: Check if the subject matches the target regex pattern (in such a case, theValuefield should be a valid PCRE regular expression).Regex Not Match: Check if the subject doesn't match the target regex pattern (in such a case, theValuefield should be a valid PCRE regular expression).Present: Check if the subject exists (e.g. headerX-Debugexists, argumentshop_idexists).Not Present: Check if the subject doesn't exist (e.g., headerX-Debugdoesn't exist, argumentshop_iddoesn't exist). :::
References
- API7 Cloud implements canary release through the Apache APISIX traffic-split plugin